OpenGL Terrain Demo
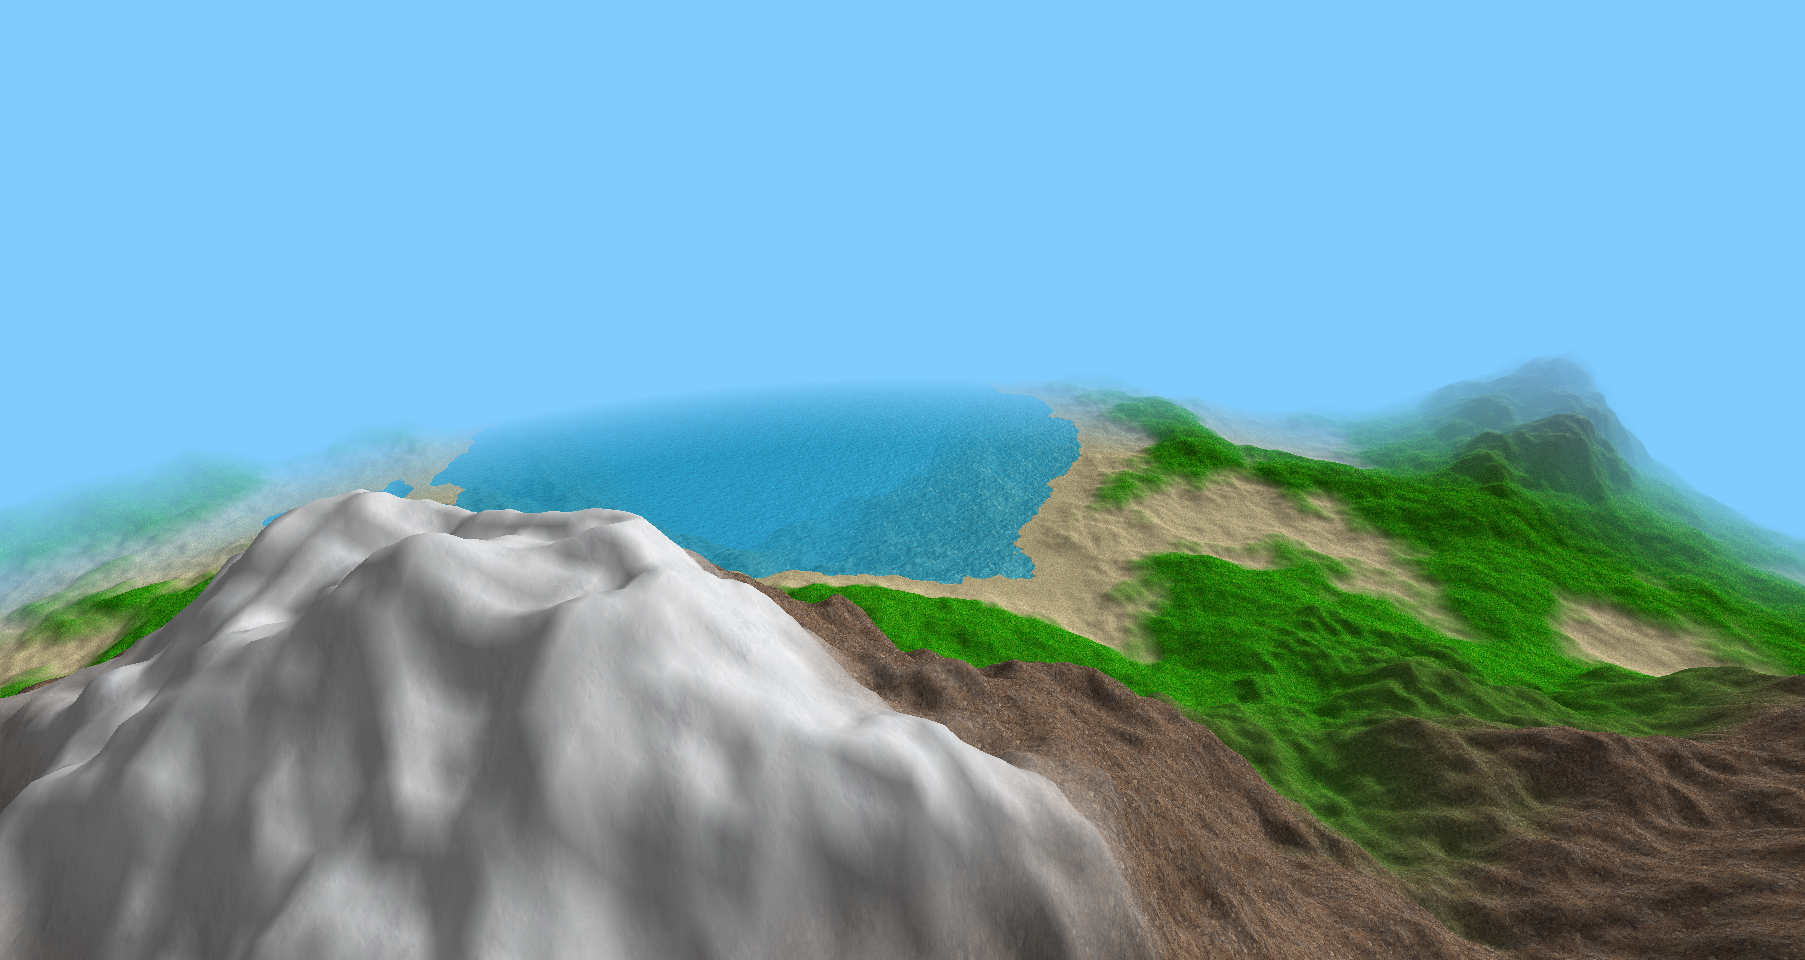
This is a small demo that I am working on that displays some procedurally generated terrain. You can watch the YouTube video demonstrating the demo here. I still want to add some more features, graphical improvements, and also polish the demo but this is what I currently have. I’m quite pleased with how it currently looks so far and I’ve learned quite a bit while working on this project and this blog post will cover some of the most interesting aspects of this demo.
Terrain Generation
The terrain is generated using perlin noise
which I have experimented with before to generate background terrain in the game
Turbulence Ahead and to generate
terrain in my Terraria clone. I first
copied the implementation on wikipedia but unforunately said implementation did
not support inputing a seed value to generate different terrain so I had to do
some research on Ken Perlin’s implementation and afterwards I learned how a
permutation table of the values 0 to 255 can be used as a seed value, and
such a permutation could be generated by plugging in a seed value to a random
number generator and using that to shuffle the numbers.
<sidenote>
It turns out that the C standard rand() kind of sucks for random number generation
and C++ provides a standard header <random> with better generators such as
std::minstd_rand and std::mt19937. I learned that while doing research on
random number generators for this project and overall my brain kind of broke
after seeing how much goes into attempting to create seemingly random numbers
with no clear pattern (I admittedly did only surface level research but it still
was interesting, I might investigate this stuff later).
Additionally, I also learned that time(NULL) isn’t the best seed generation
method as it might generate the same seed across processes if such processes
are spawned very close in time to each other, which might have undesirable effects
on the apparent ‘randomness’ of the program. It likely didn’t matter for my use
case but I decided to still opt for std::random_device to get a random seed for
the terrain generation.
</sidenote>
However, there is a problem with just using perlin noise to generate terrain: one level of it will just create an overly smooth and unnatural shaped terrain. The way to fix this is to use fractal noise. Fractal noise just takes perlin noise (or any other smooth gradient noise) and starts out by generating noise at a low frequency and high amplitude. This creates the general shape of the terrain and then afterwards we add on more noise layers with increasing frequency and decreasing amplitude. This adds a level of “roughness” to the terrain that makes it more natural.
float getHeight(float x, float z, const worldseed &permutations)
{
	float height = 0.0f;
	float freq = FREQUENCY;
	float amplitude = 1.0f;

	for(int i = 0; i < permutations.size(); i++) {
		float h = perlin::noise(x / freq, z / freq, permutations[i]) * amplitude;
		height += h;
		freq /= 2.0f;
		amplitude /= 2.0f;
	}

	return height;
}
worldseed is just a typedef for an array of permutations that are fed into the
noise function so that each noise layer is different and FREQUENCY is a
constant.
However, this still creates terrain that doesn’t feel fully natural in my
opinion as currently the distribution of heights in the terrain is uniform
which ends up making mountains feel too common and doesn’t allow for rolling
hills or flat plains and beaches. As a quick fix, I added some transformations
for the height based on the fractal noise height so that if the height is
close to the water level, then the terrain have a very gradual increase
(represented as a quadratic function for now) so that it would appear very flat
for the ‘beach biome’ and then when we went further inland, the terrain would
become a little steeper for the ‘grass biome’. Finally, for the ‘mountain biome’
the terrain would have its maximum steepness to create some nice looking
mountains. I also translated the terrain up a little and did the appropriate
scaling so that the terrain height remained between -1.0 and 1.0
(The code might not actually return normalized values at the moment though
but that isn’t a big issue for me right now as I don’t really think I can
notice any glaring visual problems for now).
The code for this is shown below:
float getHeight(float x, float z, const worldseed &permutations)
{
	float height = 0.0f;
	float freq = FREQUENCY;
	float amplitude = 1.0f;

	for(int i = 0; i < permutations.size(); i++) {
		float h = perlin::noise(x / freq, z / freq, permutations[i]) * amplitude;
		height += h;
		freq /= 2.0f;
		amplitude /= 2.0f;
	}

	height += 0.1f;
	if(height < 0.0f)
		height = height * 1.0f / 0.9f;
	else if(height < 0.1f && height >= 0.0f)
		height = 2.0f * height * height + 0.002f;
	else if(height < 0.3f && height >= 0.1f)
		height = (height - 0.1f) * 0.09f / 0.2f + 0.022f;
	else if(height >= 0.3f)
		height = (height - 0.3f) * 0.888f / 0.8f + 0.112f;

	return height;
}
This isn’t perfect however, as the transition between the derivatives of each section isn’t smooth which if you scale up the terrain and look closely, can result in some ugly artifacts. I do intend on fixing this sometime but at the moment I am too lazy to do the math.
Mesh Generation
Once we have the ability to generate the heightmap, we now need to generate the mesh that contains the terrain vertices that we can send to the GPU to be displayed onto the screen. I started by simply adding each triangle individually but this proved to be inefficient due to vertex duplication which led me to instead using an index buffer which was significantly faster.
Each vertex stores two values: the position and the normal. The position can
be obtained from the noise function and the normal can be obtained by
taking the cross product of the derivatives of the noise at that point in the
x and z directions. Initially I stored the position as a vector of 3 floats
and the normal as a vector of 3 floats. This was 24 bytes per vertex but in an
attempt to improve performance, you can simply compress the size of the mesh by
reducing the size of each vertex (this
YouTube video from Vercidium helped
me quite a bit). In summary, you can reduce the size of a terrain mesh by
cutting out the x and z coordinates of the position and using gl_VertexID to
determine the x and z coordinates in the vertex shader instead and you can
also remove a float from the normal vector by instead storing the pitch and yaw
of it. This halves the size of each vertex to only 3 floats or 12 bytes and I
attempted to decrease it further by instead storing the values as 16 bit integers
that could possibly lose some precision but halve the size of the vertex but
unfortunately I ended up getting some really buggy and completely wrong results
when I did this so I decided not to do it for now.
When generating the mesh, you have to strike a balance between the size of the mesh
and the number of triangles/vertices you want to include in the mesh. If you
increase the size, you can allow the player to see farther away with the same
number of triangles but detail is lost and if you increase the number of vertices/triangles
you increase the detail of the terrain but make the mesh bigger and make performance
worse and also increase the time it takes to generate the mesh. Of course, you
can account for this by making nearby chunks high detail with many vertices
and faraway chunks low detail with few vertices but currently I have not bothered
implementing that at the moment. Instead, I was able to strike a reasonable balance
where the number of vertices wasn’t too high but not too much detail was lost.
Currently, a 15 by 15 chunk area can be generated in ~0.9 seconds.
Terrain shader
To display the different ‘biomes’ based off of height, in the fragment shader I took into account the y coordinate of the fragment in the world space and then used that to determine where in a texture I should sample. At the border between each biome, I mixed two textures together to create a somewhat smooth transition area. To make sure the terrain doesn’t look too flat, I added some diffuse shading which just took into account one directional light.
Textures for the terrain are from OpenGameArt:
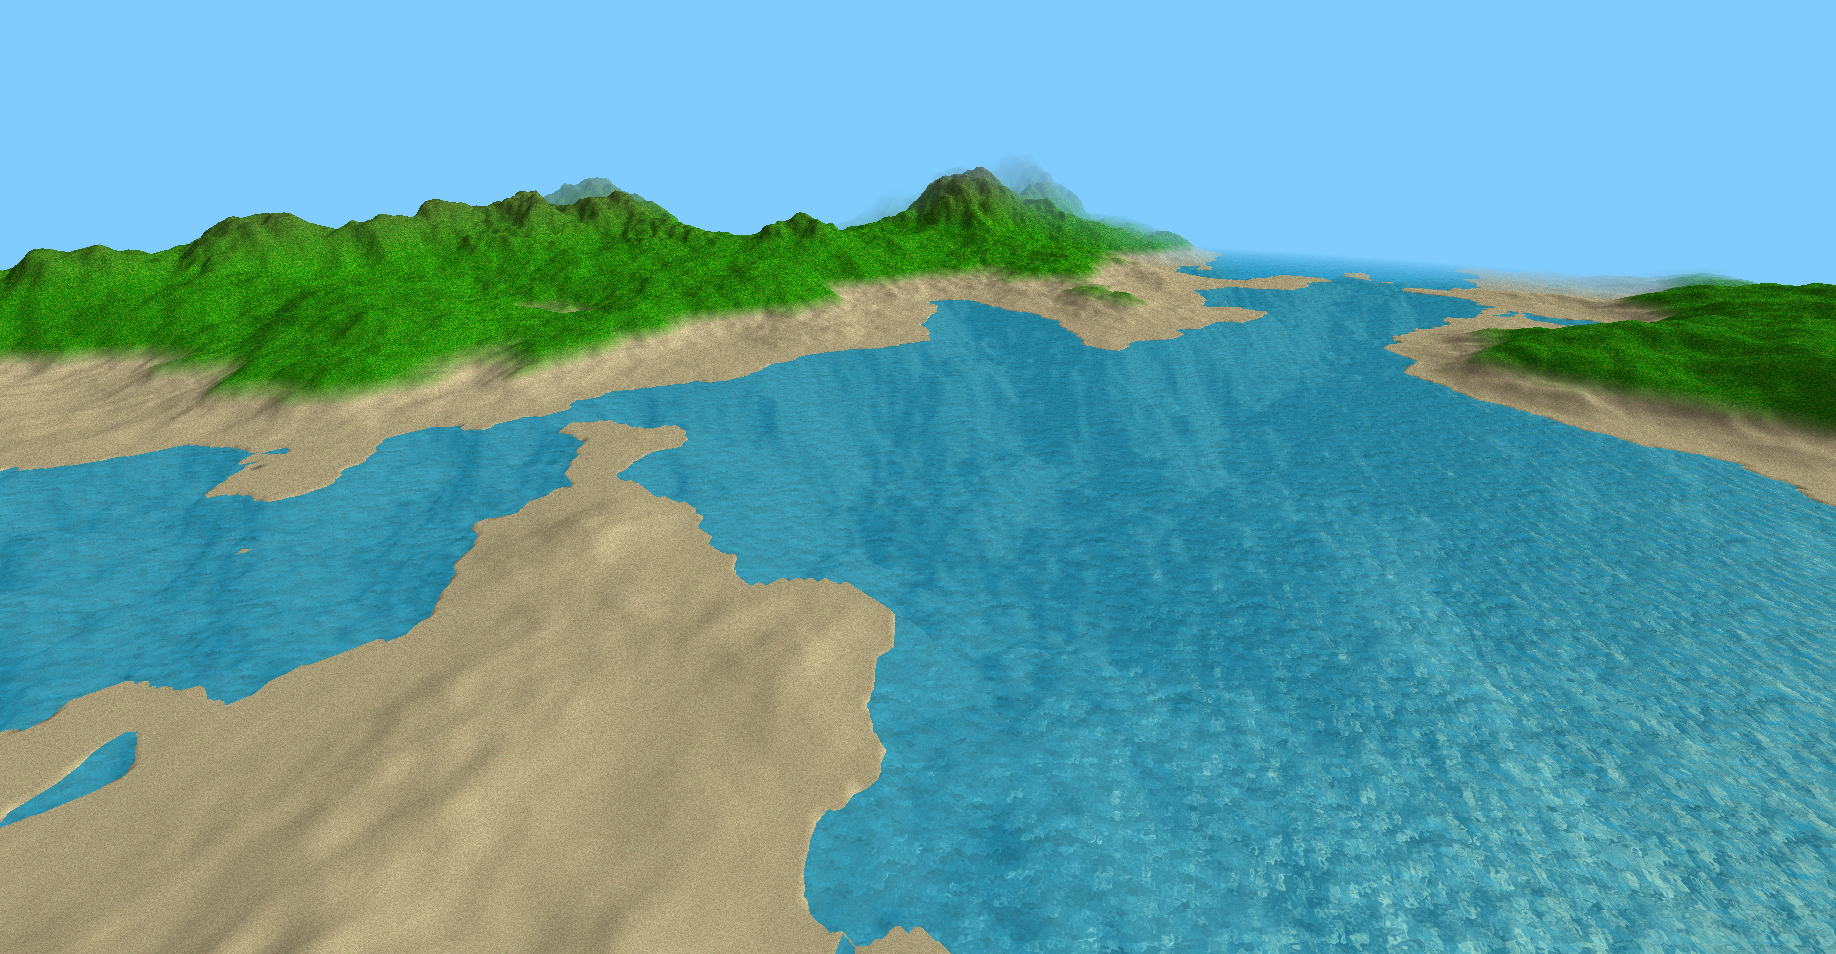
Water shader
I feel particularly proud about this implementation as I had to do some amount of research for this and I am quite pleased with how it looks at the moment. The water shader creates a nice water ripple effect - the water is actually just rendered as a flat quad that instead has two normal maps mapped on top of it so that it appears as if the water has ripples on the surface (the normal at a point is determined by the sum of the normal vectors from the normal maps at that point - normalized to be magnitude one of course). These normal maps are then scrolled in different directions and at different speeds to create an illusion of rippling. We can then apply specular and diffuse lighting to show the water waves and make the water appear shiny. I also used a dudv map to offset where each position would sample the normals to make the water look even nicer. I found this tutorial and this video from ThinMatrix to be particularly helpful in my understanding of how to make a good looking water surface effect.
Water fragment shader:
#version 330 core

out vec4 color;

in vec3 fragpos;

uniform sampler2D waternormal1;
uniform sampler2D waternormal2;
uniform sampler2D waterdudv;

uniform float time;
uniform vec3 lightdir;
uniform vec3 camerapos;

vec2 direction(float angle)
{
	return vec2(cos(angle), sin(angle));
}

void main()
{
	vec2 dudv = (texture(waterdudv, fragpos.xz / 16.0).xy - vec2(0.5, 0.5)) * 2.0;
	vec3 n1 = (texture(waternormal1, fract((fragpos.xz + dudv) / 32.0 + direction(-0.5) * 0.08 * time)).xzy - 0.5) * 2.0,
		 n2 = (texture(waternormal2, fract((fragpos.xz + dudv) / 32.0 + direction(3.14 + 0.5) * 0.05 * time)).xzy - 0.5) * 2.0;
	vec3 normal = normalize(n1 + n2);
	//specular reflection
	vec3 reflected = reflect(lightdir, normal);
	vec3 viewdir = normalize(camerapos - fragpos);
	float specular = pow(max(dot(viewdir, reflected), 0.0), 8.0);
	//diffuse lighting
	float diffuse = max(-dot(lightdir, normal), 0.0) * 0.5 + 0.5;

	color =
		vec4(0.1, 0.7, 0.9, 0.0) * diffuse +
		vec4(0.5, 0.3, 0.1, 0.0) * specular;
	color.a = 0.8;

	//fog
	float d = length(fragpos - camerapos);
	vec4 fogeffect = mix(color, vec4(0.5, 0.8, 1.0, 1.0), min(max(0.0, d - 512.0) / 128.0, 1.0));
	vec4 watereffect = mix(color, vec4(0.1, 0.7, 0.9, 1.0), min(max(0.0, d) / 24.0, 1.0));
	color = fogeffect * float(camerapos.y >= 0.0) + watereffect * float(camerapos.y < 0.0);
}
Normal maps & dudv map downloaded from:
Closing Thoughts
Overall, I’m pleased with the direction this project is going and I will attempt to continue working on it and make some improvements to it (and I hopefully will eventually make the source code public). However, it’s getting towards the end of the school year for me and AP exams/finals are coming up so I might be a little more busy than normal for the next few weeks so updates may be a little slow.
Stuff I want to add to this demo:
- a Skybox so that the background is not just bland single color
- Infinite terrain generation
- Trees/other features
- Improved performance
- Improved graphics
Additionally, I think it would be fun to then repurpose the code that I wrote to make a game where you fly a plane and view the terrain or make some other games that can utilize terrain generation. However, those are still just random ideas bouncing around my head and likely aren’t gauranteed to pan out.
Anyway, that’s it, have a nice day.